Although the emergency stop part of the car driving test, is being dropped as a necessary part of Guernsey’s testing procedure (only a third will be checked from August 2013.) Due to the view of the Environment Department, linking improvements in technology such as anti-lock braking systems. On the mainland of good ol’ blighty, you have around a one in three chance of needing to perform one as part of your practical test.
Here at A Pass 4 U we take seriously the training and safety of our pupils, as they drive on the county’s roads and our Driving Instructors are well versed in all areas of driver training, including the emergency stop.
Q. Will my Driving Instructor force me to do an emergency stop when I start to learn to drive?
A. Not initially, but eventually you will have to do one as it is part of the learning process and can be part of your driving test.
Q. What exactly is an emergency stop and how is it performed? I hear you newbie driving pupils asking, as you scour our site for information to download/copy/read up on or keep to hand when starting or continuing with your driving lessons at A Pass 4 U.
A. An emergency stop is a controlled stop made by the pupil/driver when on a driving lesson, on the practical driving test or as a qualified driver, when an unusual occurrence happens on the road and you need to act quickly and safely. Safety being the optimum goal when driving on our roads and A Pass 4 You Instructors in their tuition, will be attempting to provide you with safe driving skills for life.
Scenario:
You will be driving down the street, cars may be parked both sides of the road in a built up area and all of a sudden a football comes out from between the cars.
Q. What do you expect as a driver, to follow?(Use your noddle before looking below at the answer.)
A. In this instance you could be looking out for a child to appear.
So, what procedure would you follow, as taught by a UK registered Driving Instructor.
1. Stop – using break/clutch procedure. Which is normal braking only firmer. Do not assume that brakes fitted with ABS will stop in a shorter distance, but is should ensure that steering control will be retained.
2. Check your rear view mirror – looking for fast approaching vehicles coming from behind.
3. If safe apply your handbrake. Securing your vehicle.
4. Breathe a sigh of relief.
5. Check observation moving off procedures, using the six point safety check below.
• Left blind spot
• Left mirror
• front of vehicle
• top mirror/rear-view mirror
• right mirror
• right shoulder check blind spot
When you’re happy its safe, move off continuing to check as you go.
Of course, we are all aware that developing our driving skills comes with experience, but the tools your instructor is providing you with, are the foundation of emergency stop safety when driving a motor vehicle.
On your driving test, the examiner will be assessing your ability to stop the vehicle.
The Examiner will pull you over to the side of the road, explaining what he is going to ask you to perform. An Examiner will explain to the pupil, that he is going to ask you to carry out an emergency stop procedure. Looking over his shoulder initially to check that it is safe to do so (do not commit to the emergency stop at this point) then he will give the verbal command clearly and precisely ‘STOP.’ At the same time using an outstretched hand signal, with palm facing towards the windscreen.
What the Examiner is looking for.
The Pupil stops:
1) Promptly.
2) Braking in one smooth progressive action.
3) In a straight line with both hands firmly on the steering wheel.
4) Without locking the wheels and without any unnecessary skidding.
5) Without depressing the clutch pedal before, just until the car comes to a halt.
The Examiner will also be checking to ensure that you are:
1) Applying the handbrake
2) Placing the car into first gear, before releasing your feet from the foot brake and clutch and driving off.
Driving faults recorded to controlled stop:
1) Slow reaction to signal
2) Not stopping quickly enough
The Examiner is also looking to see that the car is under full control, you have awareness, are alert and are thinking ahead.
1) Use of brake and clutch together
2) Clutch pedal used to soon.
3) Harsh stamping rather than progressive application of the foot brake.
4) Uses handbrake to stop (doing this will lock your back wheel up and you do not have use of brake lights)
5) Induces a skid by breaking and steering at the same time. (This increases potential injuries to those around the area)
6) Loses control by skidding.
7) Observation when moving off.
On your practical test, if you are required to perform an emergency stop and fail to carry out this procedure correctly, then there is the possibility that you will not meet the standard required to pass your driving test.
Remember:
1) Weather conditions can affect braking affectability.
2) Coasting reduces driver control.
3) Don’t brake, accelerate or steer to harshly, as this can cause a car to skid.
4) In normal conditions – the safest way to brake is early and lightly. Easing the pressure off just before the vehicle comes to a stop to avoid it being jerky.
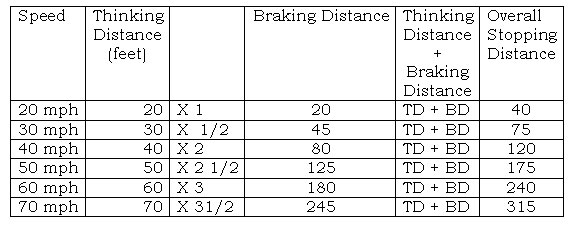
UK Stopping Distances – Highway Code
Tips on how to learn your stopping distances.
E.G. Speed 20mph = Thinking distance 20ft.
Thinking distance e.g. 20 x 1 = 20 + your speed e.g. 20mph = 40 ft. which is your overall stopping distance.


